
Delicious Cookie Monster Cheesecake
Delicious Cookie Monster Cheesecake is a whimsical and delightful dessert that brings smiles to faces young and old. This playful cheesecake combines creamy layers of rich cream cheese with a crunchy chocolate cookie crust, topped with vibrant blue frosting, and adorned with playful cookie eyes. Not only is this cheesecake a feast for the eyes, but it’s also a comforting treat that feels like a nostalgic hug in dessert form. This recipe offers a step-by-step guide to making it easy for anyone to whip up this fun dessert for family gatherings, birthday parties, or simply a treat for yourself.
Why You’ll Love This Recipe
There are countless reasons why you will adore this Cookie Monster Cheesecake. First, its eye-catching design makes it a true showstopper at any event. You’ll impress your guests with this creamy masterpiece, and it’s sure to be a conversation starter! Secondly, the preparation is straightforward with minimal ingredients. You’ll enjoy the process without feeling overwhelmed, leaving you with time to enjoy being with your loved ones. This dessert is not only delicious but also a fun project, making it a fantastic family-friendly recipe that everyone can participate in.
Ingredients
To create this delicious Cookie Monster Cheesecake, you will need the following ingredients:
- 1 1/2 cups crushed chocolate sandwich cookies: These serve as the base for a rich and crispy crust, melding perfectly with the creamy filling.
- 1/4 cup sugar: Just enough sweetness to enhance the cookie flavor without overpowering the other elements.
- 1/2 cup butter, melted: Adds richness to the crust and keeps it perfectly moist and flavorful.
- 4 packages (8 oz each) cream cheese, softened: The star of the cheesecake, lending a luscious and creamy texture.
- 1 cup sugar: Balances the tanginess of the cream cheese, ensuring a sweet delight.
- 1 cup sour cream: Adds a tangy note that cuts through the richness of the cheesecake, creating a perfect balance.
- 4 large eggs: Provide structure and creaminess while ensuring that the cheesecake sets beautifully.
- 1 teaspoon vanilla extract: Infuses a warm, aromatic note that enhances all the flavors.
- 1 cup crushed chocolate sandwich cookies: More cookies mean more deliciousness throughout the cheesecake!
- 1/2 cup mini chocolate chips: For bites of chocolate goodness scattered throughout the creamy filling.
- Blue frosting: To bring Cookie Monster to life on top of your cheesecake.
- Large cookie eyes: These add a playful touch to your creation, channeling the quirky character.
- Additional chocolate sandwich cookies for topping: Extra cookies for garnishing that are as tasty as they are stylish.
Step-by-Step Directions
1. Preheat the Oven and Prepare the Pan
To start, preheat the oven to 325°F (165°C). While the oven warms up, take a 9-inch springform pan and grease it lightly to ensure easy removal later.
2. Make the Crust
In a medium bowl, combine 1 1/2 cups crushed chocolate sandwich cookies, 1/4 cup sugar, and 1/2 cup melted butter. Mix until all ingredients are well combined. Press this mixture firmly into the bottom of your prepared pan to form a deliciously crispy crust.
3. Prepare the Cheesecake Filling
In a large bowl, beat four packages of softened cream cheese with 1 cup sugar until smooth and creamy. Add in 1 cup sour cream and continue to beat until the mixture is well combined. Then crack in the four large eggs, adding them one at a time. Make sure to beat well after each addition for a silky texture. Finally, fold in 1 teaspoon vanilla extract, 1 cup crushed cookies, and 1/2 cup mini chocolate chips to give the filling its delightful character.
4. Assemble the Cheesecake
Carefully pour the cheesecake mixture over the cookie crust in your springform pan, spreading it evenly. This layered beauty is ready for the oven!
5. Bake the Cheesecake
Bake for 60-65 minutes, or until the center is set and the edges have a slight puff to them. Once baked, allow it to cool on a wire rack for 10 minutes before running a knife around the edges to loosen. Finally, cool completely before removing the sides of the springform pan.
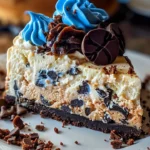
6. Decorate Your Creation
Once your cheesecake has cooled completely, it’s time for the fun part: decorating! Spread blue frosting over the top to resemble Cookie Monster’s iconic fur. Add large cookie eyes and finish off the look with additional chocolate sandwich cookies crumbled on top for extra crunch and flavor.
Tips & Tricks
For the best results, ensure that your cream cheese is at room temperature before mixing — this prevents lumps and helps achieve a smooth texture. Additionally, avoid overmixing the filling to maintain its light and airy quality. If you find the frosting too thick, consider adding a splash of milk to reach your desired consistency. And don’t forget to have fun with the decorations; let your creativity shine through!
Serving Suggestions & Pairings
This Cookie Monster Cheesecake is perfect for celebrations like birthdays or family gatherings, but it can also be a delightful treat for any occasion. Pair it with a scoop of vanilla ice cream or a dollop of whipped cream to enhance its indulgence. A side of fresh berries can also brighten the plate and add a refreshing tartness.
Nutritional Information
While this cheesecake is a rich treat, it is crucial to maintain balance in your diet. A typical slice contains approximately 400 calories, along with a good dose of sugar and fats. It’s a wonderful indulgence but best enjoyed in moderation. Each ingredient offers a blend of energy and satisfaction, ensuring it’s a rewarding treat after a meal.
Storing Tips & Variations
To store your Cookie Monster Cheesecake, simply keep it in an airtight container in the refrigerator, where it will last for about a week. You can also freeze portions wrapped tightly in plastic wrap and then placed in a freezer-safe container for up to three months. When ready to serve, allow it to thaw overnight in the fridge. For variations, consider using different colored frostings or decorating with themed toppings based on your event, like Halloween sprinkles or Christmas candies.
Conclusion
Don’t hesitate to bring a slice of fun into your kitchen with this Delicious Cookie Monster Cheesecake. The fun process of assembly and decorating makes it a fantastic family activity, and the joy it brings when served is undeniable. Give it a try and let us know your experience in the comments below!
FAQs
1. Can I make this cheesecake in advance?
Yes! This cheesecake can be made up to two days in advance. Just store it in the fridge until you are ready to serve.
2. Can I use any type of cookies for the crust?
Absolutely! While the recipe calls for chocolate sandwich cookies, feel free to experiment with your favorite cookie varieties for different flavor profiles.
3. How can I tell when my cheesecake is done?
The cheesecake is done when the edges are puffed slightly, and the center has a slight jiggle but is mostly set. It will continue to firm up as it cools.
4. Is this recipe suitable for vegans?
This specific recipe isn’t vegan-friendly due to the cream cheese and eggs. However, you can look for vegan cream cheese and egg substitutes to adapt the recipe accordingly.
5. Can I add toppings other than cookies?
Certainly! Feel free to get creative — you can top it with fruits, chocolate syrup, or caramel drizzle to add an extra layer of wow-factor to this fun cheesecake!
Cookie Monster Cheesecake
Ingredients
For the Crust
- 1.5 cups crushed chocolate sandwich cookies These serve as the base for a rich and crispy crust.
- 1/4 cup sugar Enhances the cookie flavor without overpowering other elements.
- 1/2 cup butter, melted Adds richness to the crust.
For the Cheesecake Filling
- 32 oz cream cheese, softened The star of the cheesecake, lending a luscious texture.
- 1 cup sugar Balances the tanginess of the cream cheese.
- 1 cup sour cream Adds a tangy note that cuts through the richness.
- 4 large eggs Provide structure and creaminess.
- 1 teaspoon vanilla extract Enhances all the flavors.
- 1 cup crushed chocolate sandwich cookies More cookies mean more deliciousness throughout the cheesecake.
- 1/2 cup mini chocolate chips For bites of chocolate goodness.
For Decoration
- blue frosting To bring Cookie Monster to life on top of your cheesecake.
- large cookie eyes Add a playful touch to your creation.
- additional chocolate sandwich cookies For garnishing.
Instructions
Preparation
- Preheat the oven to 325°F (165°C) and grease a 9-inch springform pan.
Make the Crust
- In a medium bowl, combine crushed chocolate sandwich cookies, sugar, and melted butter. Mix well and press into the bottom of the prepared pan.
Prepare the Cheesecake Filling
- In a large bowl, beat softened cream cheese with sugar until smooth. Mix in sour cream, then add eggs one at a time, mixing well after each addition.
- Fold in vanilla extract, crushed cookies, and mini chocolate chips.
Assemble and Bake
- Pour the cheesecake mixture over the crust in the springform pan and spread evenly.
- Bake for 60-65 minutes, until the center is set. Allow to cool on a wire rack for 10 minutes before loosening the edges with a knife. Cool completely before removing from the pan.
Decorate Your Creation
- Spread blue frosting over the top of the cooled cheesecake. Add large cookie eyes and crumble extra chocolate sandwich cookies on top.