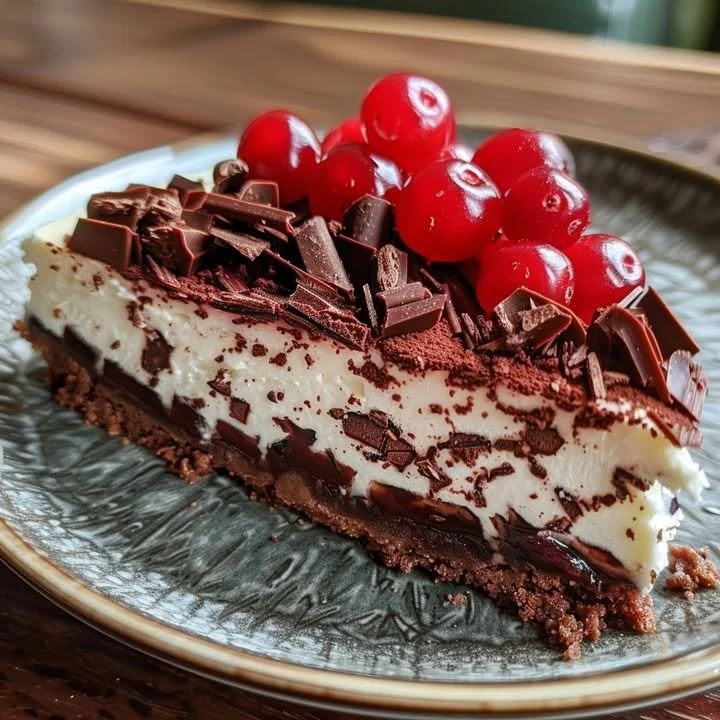
Black Forest Cheesecake
Black Forest Cheesecake is a delightful fusion of flavors and textures, combining the richness of cheesecake with the classic notes of chocolate and cherries that we all adore. This dessert isn’t just visually stunning; it’s a slice of indulgence that brings warmth and nostalgia to our hearts. With its creamy filling and tart cherry topping, Black Forest Cheesecake is a fantastic way to celebrate special occasions or simply enjoy a sweet moment with family and friends. Best of all, it comes together with relative ease, making it perfect for both novice bakers and seasoned cooks alike. In this recipe, I will guide you through a step-by-step process to create a show-stopping dessert that will soon become a favorite on your dessert table.
Why You’ll Love This Recipe
One of the best aspects of this Black Forest Cheesecake is its easy preparation. You don’t need to be a professional chef to pull off this crowd-pleaser. With minimal ingredients and straightforward steps, you can create a dessert that looks and tastes sophisticated. The combination of the crunchy chocolate cookie crust, the creamy cheesecake filling, and the vibrant cherry topping makes for an irresistible treat. Families will cherish this recipe for its comforting flavors, while guests will remember it for its elegance. It’s perfect for parties, anniversaries, or a casual dinner with friends.
Ingredients
Gathering the right ingredients is key to making a delicious Black Forest Cheesecake. Here’s what you’ll need:
- 1 1/2 cups chocolate cookie crumbs: These rich crumbs provide the perfect foundation, delivering a chocolatey crunch that pairs beautifully with the creamy filling.
- 1/4 cup granulated sugar: A hint of sweetness to balance the flavors perfectly.
- 1/3 cup unsalted butter, melted: This helps bind the crust together, adding a rich, buttery flavor.
- 24 oz cream cheese, softened: The star of our dessert; its creamy texture creates a luscious filling.
- 1 cup granulated sugar: Added for sweetness, enhancing the overall flavor of the cheesecake.
- 1 teaspoon vanilla extract: This aromatic ingredient adds depth and warmth.
- 1 cup heavy cream, whipped: For a light and fluffy consistency that elevates the cheesecake.
- 2 cups canned or jarred cherries, drained: Juicy cherries provide a refreshing tartness that complements the richness of the cheesecake.
- 1/4 cup granulated sugar: To sweeten the cherry topping just right.
- 1 tablespoon cornstarch: This will help thicken the cherry mixture for a perfect texture.
- 1/4 cup water: To bring the cherry filling together.
- Chocolate shavings or curls for garnish: For that eye-catching finish.
- Whipped cream for garnish: Adds an extra layer of creamy goodness.
- Maraschino cherries for garnish: A fun, playful touch that adds color and charm.
Step-by-Step Directions
Creating a Black Forest Cheesecake is as enjoyable as it is rewarding! Follow these step-by-step directions to craft your masterpiece:
Prepare the Crust: In a medium bowl, mix together chocolate cookie crumbs, 1/4 cup of granulated sugar, and melted butter until well combined. Press this mixture firmly into the bottom of a 9-inch springform pan, creating an even crust.
Make the Cheesecake Filling: In a large bowl, beat the softened cream cheese until smooth and creamy. Gradually add in 1 cup of granulated sugar and 1 teaspoon of vanilla extract, continuing to beat until the mixture is well combined.
Fold in Whipped Cream: Gently fold in the whipped heavy cream into the cream cheese mixture until it is smooth and fluffy. This will create a lighter texture that will melt in your mouth.
Assemble the Cheesecake: Pour the cheesecake filling over the prepared crust, spreading it evenly to ensure every bite is as delicious as the last.
Chill the Cheesecake: Refrigerate the cheesecake for at least 4 hours or until it’s fully set. This step is crucial for achieving the perfect texture.
Prepare the Cherry Filling: In a saucepan, combine the drained cherries, 1/4 cup of granulated sugar, 1 tablespoon of cornstarch, and 1/4 cup of water. Cook over medium heat, stirring constantly until the mixture thickens and becomes bubbly. Remove from heat and let cool.
Add Cherry Filling: Once the cheesecake is set, spread the cooled cherry filling generously over the top of the cheesecake.
Garnish Before Serving: Just before serving, sprinkle with chocolate shavings or curls, a dollop of whipped cream, and top with a maraschino cherry for a festive touch.
Tips & Tricks
- Use Room Temperature Ingredients: Ensure that your cream cheese is at room temperature before mixing for a smoother filling.
- Whip Cream with Care: Do not overbeat the heavy cream; aim for soft peaks to avoid a grainy texture.
- Chill Longer for Best Results: If time allows, let the cheesecake chill overnight. This enhances the flavors and allows for a firmer texture.
- Fresh Cherries Alternative: If you opt for fresh cherries, be sure to pit and slice them beforehand.
Serving Suggestions & Pairings
This Black Forest Cheesecake shines on its own but can also be paired with:
- Hot Beverages: Consider serving it with coffee or hot chocolate for a delightful contrast.
- Fruits: Fresh raspberries or strawberries can complement the flavors beautifully if you want to diversify the presentation.
- Celebratory Events: Perfect for birthdays, holidays, or gatherings, it’s a showstopper that will elevate any occasion.
Nutritional Information
Indulging in this Black Forest Cheesecake is a guilty pleasure, but let’s glance at the nutritional content:
- Calories: Approximately 400-450 per slice (depending on portion size and exact ingredients).
- Total Fat: ~30g
- Saturated Fat: ~15g
- Carbohydrates: ~35g
- Sugars: ~20g
- Protein: ~6g
Enjoy this dessert in moderation, and remember that balance is key!
Storing Tips & Variations
- Storing: Store any leftover Black Forest Cheesecake in the refrigerator, covered, for up to 5 days.
- Freezing: You can freeze slices for up to 3 months. Wrap each slice tightly in plastic wrap, then place it in an airtight container.
- Variations: Consider swapping chocolate cookie crumbs for graham cracker crumbs for a different flavor profile, or experiment with white chocolate in place of regular chocolate for a unique twist.
Conclusion
I hope you feel inspired to create your own Black Forest Cheesecake! Its rich flavors, creamy texture, and eye-catching garnishes make it worth every moment spent in the kitchen. I’d love to hear how this recipe works for you—feel free to share your experience, photos, and any twists you added to make this cheesecake your own!
FAQs
Can I use fresh cherries instead of canned?
Yes! Fresh cherries can be used as an alternative. Just make sure to pit and slice them accordingly.How long does it take for the cheesecake to set?
A minimum of 4 hours is necessary for proper setting, but overnight is ideal for best texture and flavor.Is this recipe suitable for gluten-free diets?
Yes, you can use gluten-free chocolate cookies to make the crust for a gluten-free version of this dessert.What can I do if my cheesecake cracks?
If your cheesecake cracks, don’t worry! You can cover it with cherry topping or whipped cream to hide imperfections.Can I make this cheesecake in advance?
Absolutely! This cheesecake can be made a day or two before your event, making it a convenient option for gatherings.
Enjoy creating this irresistible treat and delight your loved ones with a slice (or two) of Black Forest Cheesecake!
Black Forest Cheesecake
Ingredients
For the Crust
- 1.5 cups chocolate cookie crumbs Provides a chocolatey crunch.
- 0.25 cups granulated sugar Balances the flavors.
- 0.33 cups unsalted butter, melted Binds the crust together.
For the Cheesecake Filling
- 24 oz cream cheese, softened The star of our dessert.
- 1 cup granulated sugar Enhances flavor.
- 1 teaspoon vanilla extract Adds depth and warmth.
- 1 cup heavy cream, whipped For a light consistency.
For the Cherry Topping
- 2 cups canned or jarred cherries, drained Provides tartness.
- 0.25 cups granulated sugar To sweeten the cherry topping.
- 1 tablespoon cornstarch Helps thicken the cherry mixture.
- 0.25 cups water Brings the cherry filling together.
For Garnish
- to taste chocolate shavings or curls For decoration.
- to taste whipped cream Adds extra creaminess.
- to taste maraschino cherries For a playful touch.
Instructions
Preparation
- In a medium bowl, mix chocolate cookie crumbs, 1/4 cup granulated sugar, and melted butter until well combined. Press into the bottom of a 9-inch springform pan.
- In a large bowl, beat the cream cheese until smooth, then gradually add 1 cup sugar and 1 teaspoon vanilla extract, beating until well combined.
- Fold in whipped heavy cream until the mixture is smooth and fluffy.
Assembly and Chilling
- Pour the cheesecake filling over the prepared crust and spread evenly.
- Refrigerate for at least 4 hours or until set.
Cherry Preparation
- In a saucepan, combine drained cherries, 1/4 cup sugar, cornstarch, and water. Cook over medium heat, stirring until thickened. Let cool.
- Spread the cooled cherry filling over the set cheesecake.
Garnishing
- Before serving, garnish with chocolate shavings, a dollop of whipped cream, and top with a maraschino cherry.